Set It and Forget It: Automating RDS Start/Stop for Off-Peak Hours
By Ashwin Sharma
Efficient Cloud Resource Management: How Automating RDS Start/Stop Can Save You Money
Managing cloud resources efficiently is key to keeping costs under control while maximizing performance. One effective way to achieve this is by automating the start and stop schedules of your Amazon RDS instances using AWS Lambda. Here’s why this strategy is so valuable and how it can benefit your organization in straightforward terms.
Cost Optimization and Resource Efficiency: Saving Money by Turning Things Off
Think of it like leaving the lights on in your home when you're not there — it wastes energy and increases your bills. Similarly, running your Amazon RDS instances 24/7, even when they’re not in use, can significantly drive up costs. By automating the process of shutting down these instances during off-hours or periods of inactivity, you can make a substantial dent in your cloud spending.
Automation and Flexibility: Letting AWS Lambda Handle the Repetitive Tasks
Manual tasks are often tedious and prone to human error. AWS Lambda helps solve this by automating the start/stop process for your RDS instances. Instead of remembering to turn them off at night or over weekends, Lambda takes care of it automatically, ensuring that your instances are only running when needed — all without requiring any intervention from you.
Scalability: Adjusting Automatically to Your Needs
AWS Lambda’s ability to scale automatically is another major advantage. Whether you have a handful of RDS instances or a more complex, larger setup, Lambda adjusts to meet your needs. This flexibility ensures that your automation workflows continue to work seamlessly, no matter the size or complexity of your infrastructure.
Security and Compliance: Being Smart About When Resources Are Active
Turning off RDS instances when they’re not in use also adds a layer of security to your cloud environment. With fewer instances running, there’s less surface area for potential cyber-attacks or vulnerabilities. Moreover, automating the start/stop schedule helps you stay compliant with internal policies and external regulations, ensuring that your resources are only accessible during the hours they should be..
Architecture diagram:-
Make sure you have the following:
1. An AWS account with admin access to Amazon RDS.
2. An RDS database instance like “example-1”, which I already have set up.
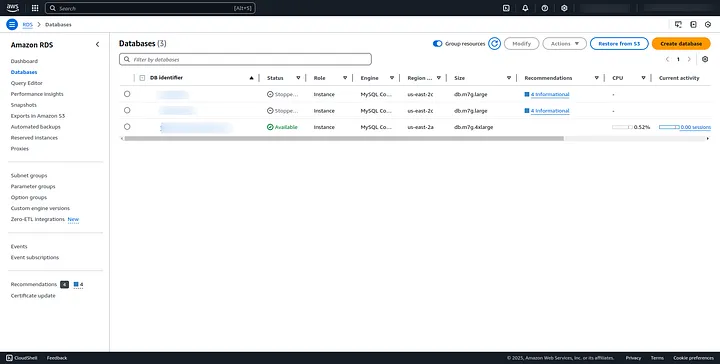
Step 1 — Assign Tags to the RDS Database Instance
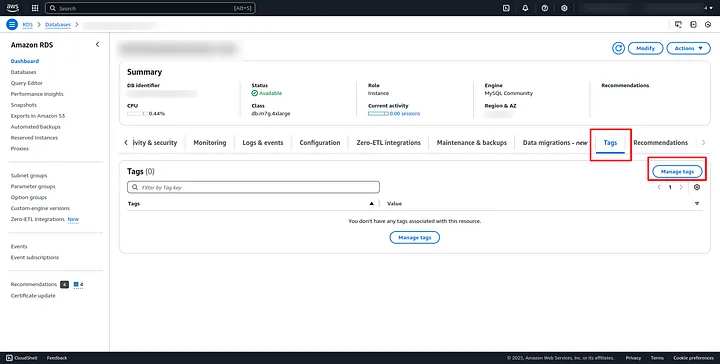
- Go to the Amazon RDS Console and select the database. Then, choose the DB instance that you want to add tags to.
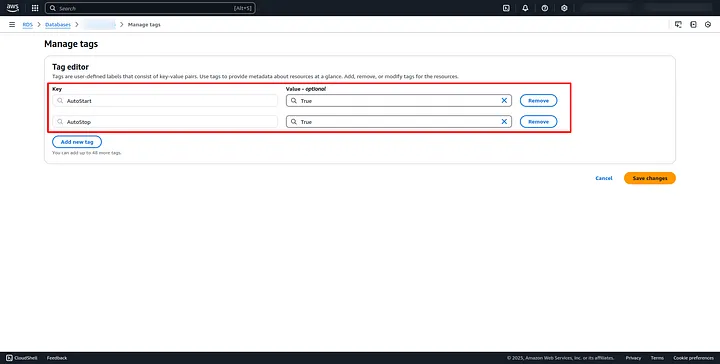
- In the Tags section, click on Add tags.
- For the Tag Key, type AutoStart and AutoStop. For the Value, type True, then click on Add.
Step 2 — Create an IAM Policy and Role for Lambda
Now, we’ll create an IAM policy and a role that allows AWS Lambda to start and stop your RDS instances.
1. Open the IAM console. In the left-hand menu under Access Management, click on Policies and then select Create Policy.

Step 2 — Create an IAM Policy and Role for Lambda
Next, we will create an IAM policy and role that allows AWS Lambda to start and stop the RDS instances
1. Open the IAM console and, from the left-hand navigation, click on Policies under Access Management. Then click on Create Policy.
2. In the Create Policy screen, choose the JSON tab to define a custom policy.
3. Copy and paste the following JSON policy into the editor:
                            {
                            “Version”: “2012–10–17”,
                            “Statement”: [
                            {
                            “Sid”: “Statement1”,
                            “Effect”: “Allow”,
                            “Action”: [
                            “rds:DescribeDBClusterParameters”,
                            “rds:StartDBCluster”,
                            “rds:StopDBCluster”,
                            “rds:StopDBInstance”,
                            “rds:StartDBInstance”,
                            “rds:ListTagsForResource”,
                            “rds:DescribeDBInstances”,
                            “rds:DescribeSourceRegions”,
                            “rds:DescribeDBClusterEndpoints”,
                            “rds:DescribeDBClusters”
                            ],
                            “Resource”: “*”
                            }
                            ]
                            }
After pasting the policy, click on Review Policy and give the policy a name (e.g., LambdaRDSStartStopPolicy), then click Create Policy.
Step 3 — Create an IAM Role and Attach the Policy
Next, we will create an IAM role that Lambda can assume, and we will attach the policy you just created to this role.
1. Go to the IAM console.
2. In the left-hand menu, click on Roles.
3. Click on Create role.
4. Choose Lambda as the trusted service that will use this role.
5. Click on Next: Permissions to move to the next step.
6. Now, you have created an IAM role with the required permissions for your Lambda function to start and stop Amazon RDS instances.
7. When you create or update your Lambda function in the AWS Lambda console, make sure to assign this IAM role to the function.
Create a Lambda Function to Stop the Database
We will create two Lambda functions: one for stopping the database and another for starting it. First, let’s focus on creating the function to stop the database.
1. Open the Lambda console. In the left-hand menu, click on Functions, then click on Create function.
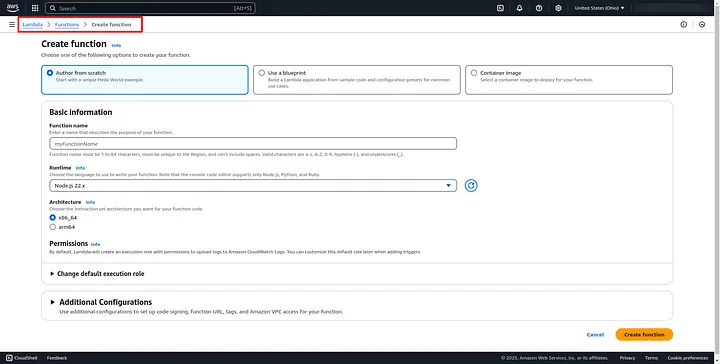
2. Select Author from scratch.
3. Give your function a name (e.g., StopRDSInstanceFunction), choose Python as the runtime, and under Existing role, select the IAM role you created earlier (e.g., LambdaRDSStartStopRole).
4. On the Function details page, go to the Function code section.
5. Delete the default sample code.
6.Copy and paste the following code to stop the RDS instance into the code editor:
                                import boto3
                                rds = boto3.client(‘rds’)

                                def lambda_handler(event, context):

                                # Stop DB instances
                                dbs = rds.describe_db_instances()
                                for db in dbs[‘DBInstances’]:
                                # Check if the DB instance is not already stopped
                                if (db[‘DBInstanceStatus’] == ‘available’):
                                try:
                                GetTags = rds.list_tags_for_resource(ResourceName=db[‘DBInstanceArn’])[‘TagList’]
                                for tags in GetTags:
                                # If the tag “AutoStop=True” is set for the instance, stop it
                                if(tags[‘Key’] == ‘AutoStop’ and tags[‘Value’] == ‘True’):
                                result = rds.stop_db_instance(DBInstanceIdentifier=db[‘DBInstanceIdentifier’])
                                print (“Stopping instance: {0}.”.format(db[‘DBInstanceIdentifier’]))
                                except Exception as e:
                                print (“Cannot stop instance {0}.”.format(db[‘DBInstanceIdentifier’]))
                                print(e)

                                if __name__ == “__main__”:
                                lambda_handler(None, None)
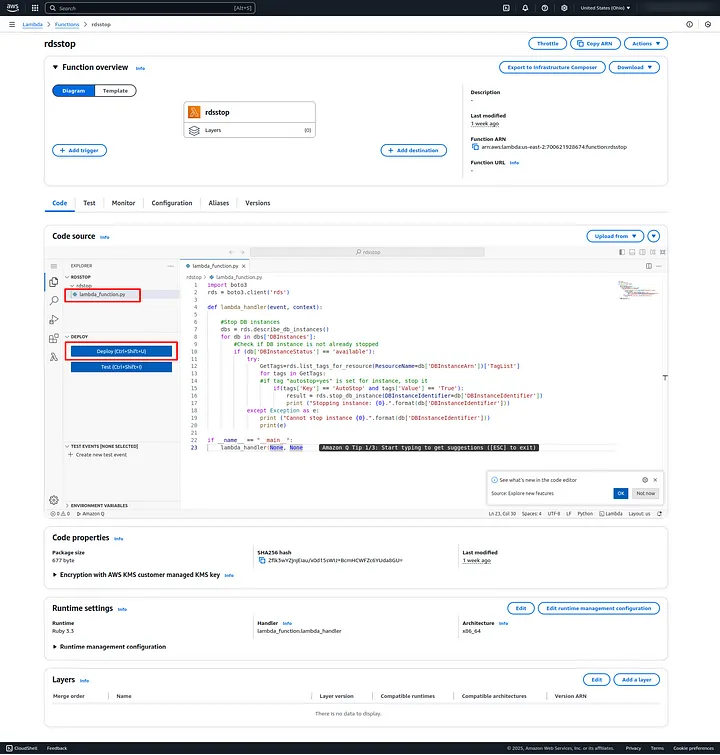
- Click on Deploy to create and save your Lambda function.
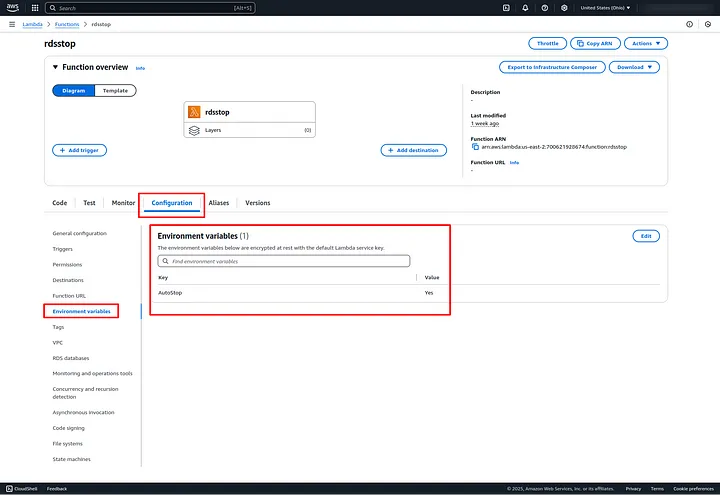
- Go to the Configuration tab, then select Environment Variables. Click on Edit and add the environment variables as shown below.
- You can test your Lambda functions directly in the Lambda console by clicking on Test.
Create a Lambda Function to Start the RDS Database1. Follow the same steps as before, but this time, create a new Lambda function that will start the RDS instances.
2. Copy and paste the code to start RDS instances into the code editor.
                                import boto3
                                rds = boto3.client(‘rds’)

                                def lambda_handler(event, context):

                                # Start DB Instances
                                dbs = rds.describe_db_instances()
                                for db in dbs[‘DBInstances’]:
                                # Check if the DB instance is stopped. If so, start it.
                                if (db[‘DBInstanceStatus’] == ‘stopped’):
                                try:
                                GetTags = rds.list_tags_for_resource(ResourceName=db[‘DBInstanceArn’])[‘TagList’]
                                for tags in GetTags:
                                # If the tag “AutoStart=True” is set for the instance, start it
                                if(tags[‘Key’] == ‘AutoStart’ and tags[‘Value’] == ‘True’):
                                result = rds.start_db_instance(DBInstanceIdentifier=db[‘DBInstanceIdentifier’])
                                print (“Starting instance: {0}.”.format(db[‘DBInstanceIdentifier’]))
                                except Exception as e:
                                print (“Cannot start instance {0}.”.format(db[‘DBInstanceIdentifier’]))
                                print(e)

                                if __name__ == “__main__”:
                                lambda_handler(None, None)

                                This code checks all RDS instances and starts those with the tag AutoStart=True.
3. Click on Deploy to create and save your Lambda function.
4. Go to the Configuration tab, then click on Environment Variables. Select Edit and add the environment variables as shown below.
5. You can test your Lambda functions directly in the Lambda console by clicking on Test.
Step 4.1 — Create an Amazon EventBridge Rule to Stop RDS Database.
1. Amazon EventBridge rules will trigger the Lambda functions we created to stop or start the tagged database on a scheduled basis.
2. Enter the rule details, such as the name and description. Choose Rule type as Schedule, then click on Continue.
3. In the Schedule pattern section, select Recurring schedule and choose Cron-based schedule for the schedule type.
4. Enter the following Cron expression: (0 20 * * ? *). This schedule will trigger every day at 8:00 PM. Afterward, click on Next.
5. In the Select Targets section, choose AWS Lambda and select Invoke.
6. For Function, choose the stop function you created (e.g., rdsstop).
7. Click on Next, then review your settings and click Create to create the schedule.
Step 4.2 — Create an Amazon EventBridge Rule to Start RDS
1. Follow the same steps as before to create a rule that triggers the rdsstart Lambda function at your preferred scheduled time, such as 8:00 AM.
Happy learning!